I took some time researching Slapstick artists, when we deal with this subject that name that come right away to our head is Charlie Chaplin, an amazing actor who was a genius making people laugh with merely motion and face expressions. The energy that he gives to the whole film is amazing, and the face expressions he does really gives you a clear sense what he is feeling, if it is fear or pain. Apart from all of that, the way he moves really gives that extra fun to the film and characterizes even more the actor.
Charlie Chaplin
also, with some help of a list of Slapstick Actors that you can find Here
I discovered some other names of the early cinema, which I was unfamiliar with but I guess I have to look at their films as well as they Speechless films are just as amazing and funny.
Harold Lloyd
I realised that Lloyd's work apart from belonging to the mute cinema era as Chaplin's films, it has the factor fun in them but not presented in extreme goofy way, where Chaplin has.
Buster Keaton
One of the question that were in my head while watching this and some other sequences from Keaton's films, was 'Does he not get hurt?", the crazy movements and jumps look like something out of a 2d animation. purely brilliant!
Also, It reminded me,what I heard Johnny Depp say in one of Edward Scissorhands documentaries, that him to convey a character that didnt speak much and where the only to communicate was through gestures. He had to watch Chaplin's movies and that made, who is a master of emotions through motion, and that made Depp's character really emotional through only face expressions and gestures.
Johnny Depp in Edward Scissorhands

Sunday, 31 January 2010
The Alchemist, Paulo Coelho

I have finishing to read the Alchemist.
This book is by a Brazilian writer Paulo Coelho, famous for his spiritual type of book, one that can give you a moral lesson as well as a good narrative behind.
It tells a story of a Shepperd who was used to wander the landscape of Andalusia in search of food and water for his sheep, living his life alone with the only company of his sheep he start to get used to them and also learning with them. Until one day , when he had a one dream for the second time, which he believed it was a omen, after deciphering what was the dream about with the help of a old gypsy woman. the answer was a treasure hidden within the Pyramids in Egypt.
The boy eager to find the treasure departed on a quest to the Egypt, He suffered many disadventures, such as been robbed twice and captured others, he met with a person with otherwordly intellect, The Alchemist, that for him to find the treasure he would need to speak the language of the Soul of the World, which meant worship every little nature being around him or us. As he arrived to the Pyramids, where the boy was robbed twice, one of his robbers said to him that he had a dream that the hidden treasure would be in a old church ( the same church where the boy was used to sleep) in Spain.
This book can be a really good inspiration, that tells you mainly that you should worship every present day and don't think of the future or past, "live one day each time" like the proverb says, but also that sometimes the most amazing things in live are right next to us, and sometimes we dont realise until its too late.
For the shepperd the real treasure was the trip he did where he found love, learnt a bit more of the world and saw the Pyramids.
A beautiful story, which is really easy to read.
Saturday, 30 January 2010
Back to Work
After a full week of relaxation to get some inspiration for my next project, I found sometimes helpful when you give a break on yourself. So I am back with some ideas for this project using the elements given, but i will share them when I get some visual research as well as drawings to accompany it.
Meanwhile, I was ,once again, browsing the books section in Amazon, and open my pockets and bought myself two books that not only will help me with this unit as it deasl with animation but also throughout my 3 years in this course.
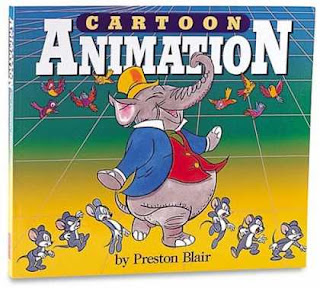
Cartoon Animation by Preston Blair
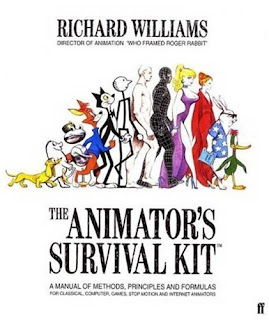
The Animator's Survival Kit by Richard Williams
Recommended by the tutors of our course :)
Although, I havent got them yet, I had a look through them as free-ebooks, ( but like I say I prefer a good chunky book), So far I found amazing tips about motion character given by legends of the Animation.
Surely, this book wont make you a good animator but will give you tips how to make your animations better, despite using 3d or classic animation. I would say it is a must buy for any of my colleagues.
Meanwhile, I was ,once again, browsing the books section in Amazon, and open my pockets and bought myself two books that not only will help me with this unit as it deasl with animation but also throughout my 3 years in this course.
Cartoon Animation by Preston Blair

The Animator's Survival Kit by Richard Williams

Recommended by the tutors of our course :)
Although, I havent got them yet, I had a look through them as free-ebooks, ( but like I say I prefer a good chunky book), So far I found amazing tips about motion character given by legends of the Animation.
Surely, this book wont make you a good animator but will give you tips how to make your animations better, despite using 3d or classic animation. I would say it is a must buy for any of my colleagues.
Wednesday, 27 January 2010
Unit 04- Further Research into the terms
After a few days off, relaxing and practising only my drawing skills, I am finally ready to start this new unit. So I did a further research to break down the words that were given to me, because some I wasn't sure about, also got some reference pictures to help me understand these same words.
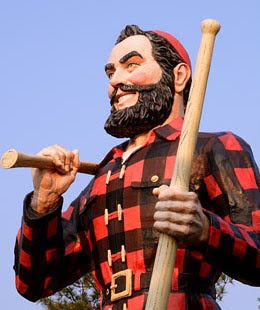
Lumberjack
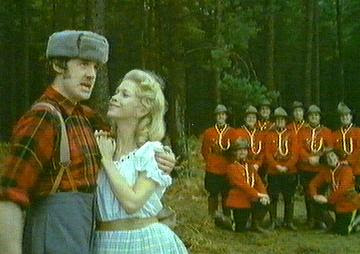
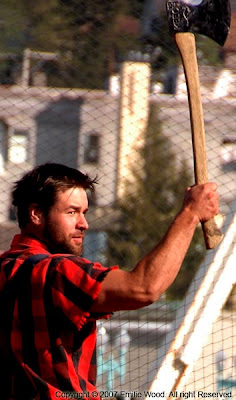
 All these images, alongside even more will be really helpful when creating the character to give a extremely similar and believable look to him.
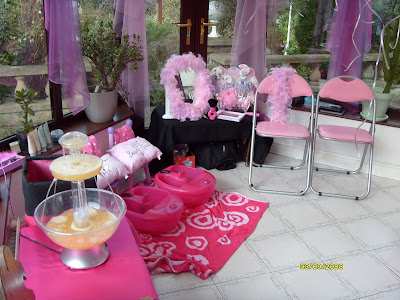
Beauty Parlour
An establishment providing women with services that include hair treatment, manicures, and facials. Also called beauty salon, beauty shop.
On the other hand, really opposite words come to my mind when I think of this word, femininity, beauty, clean, posh and beauty treatments, hair, manicure or facials.

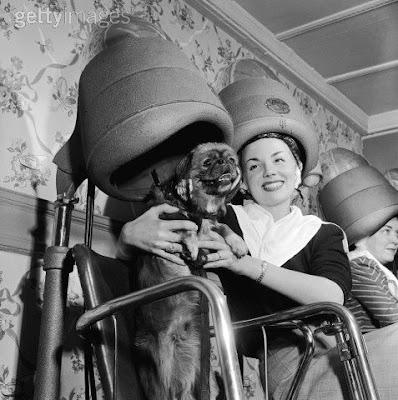
As these is going to be my space in the three act animation, I will come up with some concept art that sets the time and style of the Beauty Parlour.
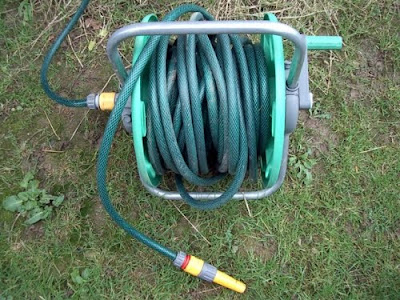
Hosepipe
flexible pipe for conveying a liquid or gas.

it is a object that can be used in our garden, in any kitchen appliances such a sink and boiler, or even by fireman.
Now that I brokedown the terms I'm ready to do more visual research and sketches :).
Lumberjack
One who fells trees and transports the timber to a mill; a logger.
When I think of Lumberjack, some words come to my mind such as, masculinity, being strong, rough and fearless, but also Canadian, lumberjack shirt and beard.
I found this Monty Python TV Sketch Show, that is somehow related to my character and to the story, I will be telling.


 All these images, alongside even more will be really helpful when creating the character to give a extremely similar and believable look to him.
Beauty Parlour
An establishment providing women with services that include hair treatment, manicures, and facials. Also called beauty salon, beauty shop.
On the other hand, really opposite words come to my mind when I think of this word, femininity, beauty, clean, posh and beauty treatments, hair, manicure or facials.


As these is going to be my space in the three act animation, I will come up with some concept art that sets the time and style of the Beauty Parlour.
Hosepipe
flexible pipe for conveying a liquid or gas.

it is a object that can be used in our garden, in any kitchen appliances such a sink and boiler, or even by fireman.
Now that I brokedown the terms I'm ready to do more visual research and sketches :).
Monday, 25 January 2010
Unit 04- Story-Telling
A new unit is already on, though we havent received any more informatin apart the brief, its time to start to work. In this unit, e are asked to create a 1 minute pre-viz three act animation, witht he words that were given to us in these mysterious envelopes, also elaborate a storyboard and create our own characters, something that I always liked to do.
So after all opening these once mysterious envelopes, in them we could read 3 random words put together, and according to Ethan , it seems like a cluedo game.
Once again to present my words which are:
Lumberjack
Beauty Parlour
Hosepipe
I am already loving the opposition provoked from these 3 words that surely I will be using as my favour on the animation.
To understand a bit better about storyboard sequences and pre-viz animations, I had a look in you tube for some examples.
Pre-Viz Animation: 2012
Storyboard Sequence: Lord of the Rings
After, researched this 2 examples, I realized how useful a storyboard or a pre-viz animation is to a film, that even before is getting shot all the ideas are already set in the paper and everything is already planned how to go.
Also, to not forget is a 1500 words assignment added to this unit as well.
And I'm ready to start after a long weekend and a day relaxing :)
So after all opening these once mysterious envelopes, in them we could read 3 random words put together, and according to Ethan , it seems like a cluedo game.
Once again to present my words which are:
Lumberjack

Beauty Parlour

Hosepipe

I am already loving the opposition provoked from these 3 words that surely I will be using as my favour on the animation.
To understand a bit better about storyboard sequences and pre-viz animations, I had a look in you tube for some examples.
Pre-Viz Animation: 2012
Storyboard Sequence: Lord of the Rings
After, researched this 2 examples, I realized how useful a storyboard or a pre-viz animation is to a film, that even before is getting shot all the ideas are already set in the paper and everything is already planned how to go.
Also, to not forget is a 1500 words assignment added to this unit as well.
And I'm ready to start after a long weekend and a day relaxing :)
Maya Tutorials: Camera Rig week 3- Focal Length
Here is the missing Maya tutorial, I hadn't done, after a exhaustive weekend at work I took a little time and finished it. It was fairly easy and I'm sure will be handy for animations to come :).
Focal Length 35

Focal Length 100
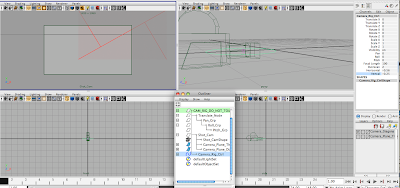
Focal Length 4.5
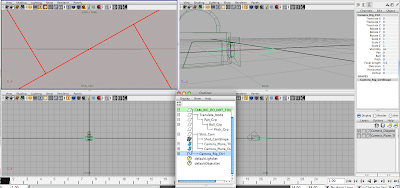
Focal Length 35

Focal Length 100

Focal Length 4.5

Friday, 22 January 2010
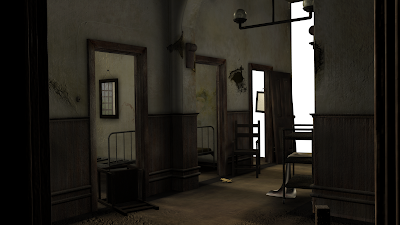
Unit 03- Final Evaluation and Crit's Response
Evaluation and Crit's response:
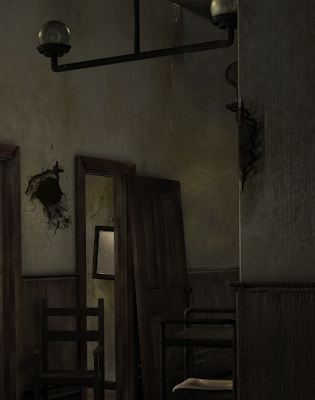
This project, I would say was the biggest achievement for me in this course so far in terms of technical side. not only I employed skills learnt in Phil's photoshop classes in my concept art, textures and posterior backdrop, but also Alan's exhaustive but helpful tutorials, ranging most of the basic skills in Maya.
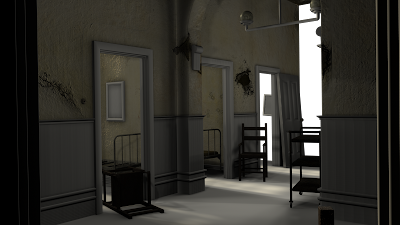
So I presented this image today, as part of my unit 3 project, Uncanny as well as ambiguous environment, and it mainly received good reviews not only because it is related to the topic, but also to the realism applied in it as well as attention to detail.
Finally, I would like to thank to Simon Holland, who helped me a lot to get the walls right like I wanted. Always good when your work is appreciated. And another step towards the CG World.
Also, another project, is at the door, and I'm hoping to read over the brief this weekend, if my tiring hours at work permit me.
A quick note of the random words, I have:
This project, I would say was the biggest achievement for me in this course so far in terms of technical side. not only I employed skills learnt in Phil's photoshop classes in my concept art, textures and posterior backdrop, but also Alan's exhaustive but helpful tutorials, ranging most of the basic skills in Maya.
So I presented this image today, as part of my unit 3 project, Uncanny as well as ambiguous environment, and it mainly received good reviews not only because it is related to the topic, but also to the realism applied in it as well as attention to detail.
Finally, I would like to thank to Simon Holland, who helped me a lot to get the walls right like I wanted. Always good when your work is appreciated. And another step towards the CG World.
Also, another project, is at the door, and I'm hoping to read over the brief this weekend, if my tiring hours at work permit me.
A quick note of the random words, I have:
- Beauty Parlour
- Lumberjack
- Hosepipe
Thursday, 21 January 2010
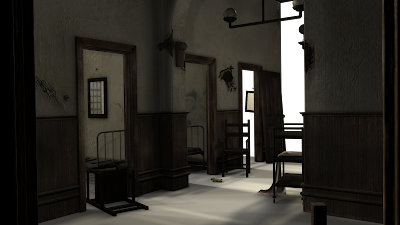
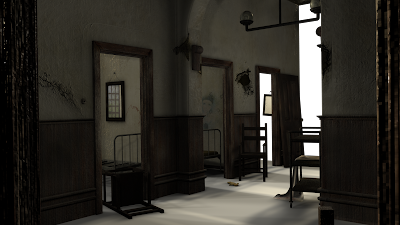
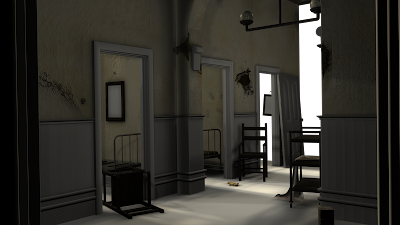
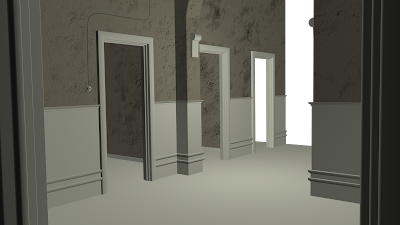
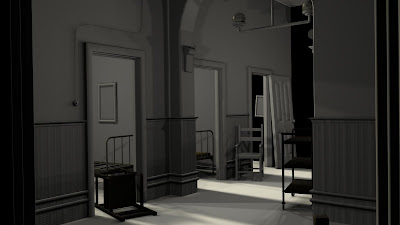
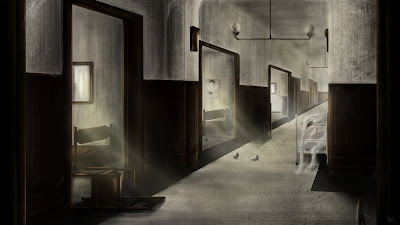
Unit 03 - Maya: Final Scene, Uncanny Hospital
Final Scene
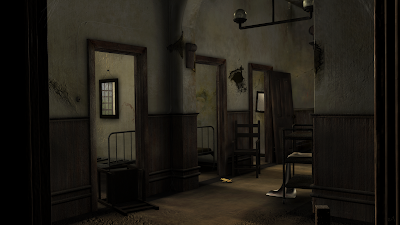
So this is my final scene where I linked the backdrop and the Maya rendering.
Maya Render
Backdrop
Also later, I shall post my evaluation alongside the crit's response towards this project.

So this is my final scene where I linked the backdrop and the Maya rendering.
Maya Render

Backdrop

Also later, I shall post my evaluation alongside the crit's response towards this project.
Unit 03 - Maya:Hospital Scene Floor

After finishing texturing the wooden details of the corridor and tweak them as I wanted I moved on to the floor, for this I wanted to create a grunged floor but where the viewer was still able to define it.
Wednesday, 20 January 2010
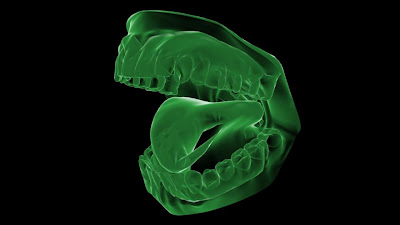
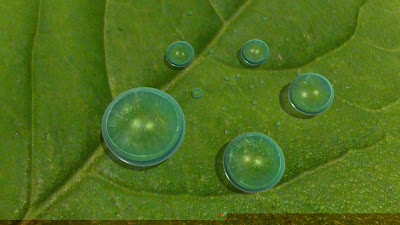
Maya Tutorials: Sampler Info Nodes Tutorials
Here are the tutorials for this week, Sampler Info Nodes part of texturing, some of them were quite helpful for my project as well.
Book- Right page

Book- Left Page

X-Ray Transparency
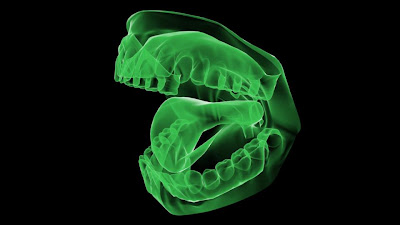 X-Ray Normal
Water Droplets
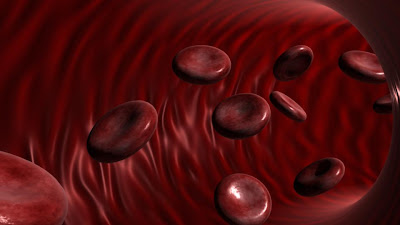
Blood Vessels
Book- Right page

Book- Left Page

X-Ray Transparency

Water Droplets

Blood Vessels

Tuesday, 19 January 2010
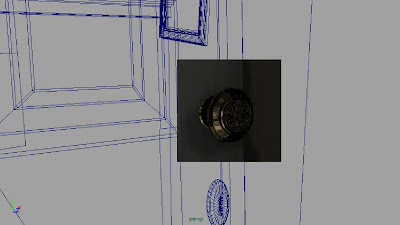
Unit 03 - Maya: Door Frames and again some more tweaking
Right Version
Wrong Version
I made it through making the door frames with no problem until the point I put it in Maya and the closer one was too pixelated so I took it back on photoshop in a new Uv map Document and started to make it happen again, after all it is working but I will add some more detail in photoshop I think I just dont want it to look extremely fake.
Only the floor to go.

Wrong Version

I made it through making the door frames with no problem until the point I put it in Maya and the closer one was too pixelated so I took it back on photoshop in a new Uv map Document and started to make it happen again, after all it is working but I will add some more detail in photoshop I think I just dont want it to look extremely fake.
Only the floor to go.
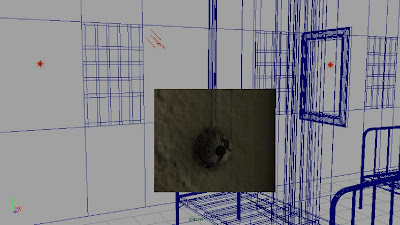
Unit 03 - Maya: Door Texture and some more tweaking on the bumps

I finished the texture on the door with no problem,and its colour is looking quite similar to the other textures, which was my objective. but also, I have tweaked a little bit the bump depth on the wood as it was too deep and quite unreal.
And that leaves me with only 2 objects to texture the floor and the door frames.
Unit 03 - Maya: Skirting Boards textured

I have finally textured the skirting boards and some other wooden details in my scene, reproduce wood is quite difficult and adding the faded and old effect is even more complicated but i think I could achieve something im quite pleased with after a lot of tweaking...
if anybody got some tips they are more than welcome...
Monday, 18 January 2010
Unit 03 - Maya: Mirror Reflections

So I add some a problem when importing the mirror reflection blinn into the scene it didnt really reflect what I wanted, just half of it, but and according to Tutor Phil, I took it off the scene ( the reflection) and something strange happen, it started to reflect the fake wall and windows I have put to create more realistic shadows. It gave me an idea instantly, I leave it and started to create a metaphor with it, also to look more realistic I added a background picture of a outside view.
I think sometimes can happen good accidents!


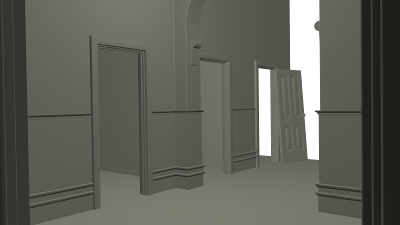
Unit 03 - Maya: Hospital Scene Update
After reading some comments on my previous post I decided to do some tweaking related to the thickness of the door and the intensity of the bumps on the wall, As well a, start to texture some more objects. Here is the scene so far:

Sunday, 17 January 2010
Refractive Index for 3D Modellers
Hi guys, It is just a quick post, to echo what Alan said to us in the beginning of our Maya Classes back in Unit 1.
I know most of you are on the texturing stage so I found this really helpful Refractive Index, which is really helpful when dealing with glass or any reflective surface that consists refraction.
It can be found Here!
I know most of you are on the texturing stage so I found this really helpful Refractive Index, which is really helpful when dealing with glass or any reflective surface that consists refraction.
It can be found Here!
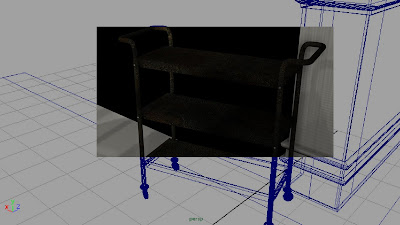
Unit 03 - Maya: Final Details on the Corridor, Ncloth, etc.
 Scene Updated
Once again I reviewed my scene to find what was missing and what in my opinion was missing logic.
so to start with I added a nail and a cord on the mirror as any mirror doesn't stand alone attached to the wall, after that I added the missing objects to my scene, the doll and the cloth.
As I didnt to get too confused with modeling an really organic and detailed doll, I decided to go for simple shapes, the object is just to add a more eerie sense to the scene, that will be completed by the rest of the textures.
Ncloth View

In the cloth matter, I always wanted to add a cloth into my scene hanging from the hospital table, so last Friday, I asked Alan, what tool was best for this purpose which he pointed me the really cool Ncloth, I didnt go further with ncloth as I know some 3rd years are having problems with it, I just really wanted the organic shape of cloth, also I played a bit with the attributes and presets. Really fun! I can say Ncloth FTW! :)
P.S- sry for the JPEG Quality
Unit 03 - Maya: Update on the scene
This post is just a update on the scene, I ahve finally change the lighting and, I may keep this one until the final render, I finished my walls texture and I think I achieved a really good effect on them.. with help from Simon, Phil and Rich.. who pointed me the right way :)
1st wall texture, I made it was too flat and didnt have any interesting cracks and grunge effects
Final texture of the wall, I added some major details as well as others.
1st wall texture, I made it was too flat and didnt have any interesting cracks and grunge effects

Final texture of the wall, I added some major details as well as others.

Unit 03 - Maya: Final Details,' I am loving Bump Mapping'
After starting to look a bit more into Bump Mapping, I now understand how crucial they to make your scene look 'alive' or 3d , and leave the 'flat and 2d world, bump mapping added to spec mapping create the aesthetics of your environment. So I took a look through once again on Alan's tutorials and start to create my own bump maps and specs added to the colour.


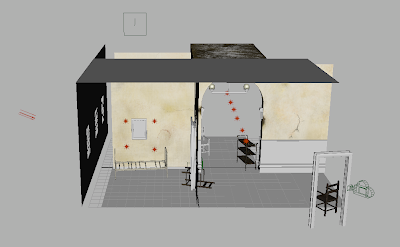
Unit 03- Maya: Creating a 'fake' wall atmospheric purposes
I decided to create a 'fake wall' not textured, not with the uvs laid out just a plain model to give me the opportunity to create some more 'closed' shadows, meaning that the shadows wont go all the way through the hallway but instead stop when they reach the window or in this case the surface.

So far the scene layout is looking just like a scene produced in a studio, but it will have the reality factor in it.
Scene Layout

So far the scene layout is looking just like a scene produced in a studio, but it will have the reality factor in it.
Scene Layout

Friday, 15 January 2010
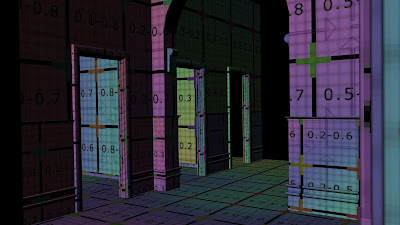
Unit 03- Maya: lighting tests on my scene (question for Alan)
I did some tests on my scene with lighting. After I asked Alan for some help, he dpointed me to create point lights, over the whole corridor and some inside the rooms to give some ambient lighting, and apply a directional light coming from the side ( I just have to model a plane and a window to create the light shape). Also, I did some experiments with some other attributes.
1 Point Lighting in the center of the room
5 Point Lightings on the corridor

Directional Lighting

Final Test
Alan, I did as you did on the Maya class but it's not looking the same, I have put the same attributes but I had to lower the number of lights, otherwise would look to bright. Also the shadows on the skirting boards look a bit weird, is it the shader? Thank you .
1 Point Lighting in the center of the room

5 Point Lightings on the corridor

Directional Lighting

Final Test

Alan, I did as you did on the Maya class but it's not looking the same, I have put the same attributes but I had to lower the number of lights, otherwise would look to bright. Also the shadows on the skirting boards look a bit weird, is it the shader? Thank you .
Thursday, 14 January 2010
Unit 03 - Maya: Progress on Hospital Scene
I finished to place the objects in the scene, as I had to import them I checked if the scale was right and so far looks fine to me, if anybody could check any mistake would be great if it let me know before I start texturing.
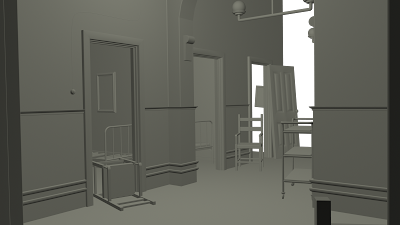 P.S: I will paint the white part as my digital painted background, and maybe camera will have some minor tweaks.
Anyway, I think I should take you into a 'time machine' trip throughout my progress on these modeling and laying out UVs Stage.


 P.S: I will paint the white part as my digital painted background, and maybe camera will have some minor tweaks.
Anyway, I think I should take you into a 'time machine' trip throughout my progress on these modeling and laying out UVs Stage.


Subscribe to:
Comments (Atom)